Laman

Minggu, 14 Agustus 2016

IVR for time information in BAHASA

What is IVR for time information?
when we dial from extension *60, our Asterisk server will answer the call and then give information about current time. It's in English. How we can build it in BAHASA.
  • first, we must understand about dialplan in asterisk. By default dialplan configuration on asterisk is saved in extension.conf. For safety we have to create new file of dialplan configuration and include it in extension.conf.
    • add this lines on extension.conf :
      • ;link ke #include extensions_ivr.conf
      • #include extensions_ivr.conf 
  • create new file extensions_ivr.conf in /etc/asterisk
    • nano extensions_ivr.conf , copy & paste this lines into it 
      • [ext-local-custom]
        exten => 660,1,AGI(waktu.php)
      •  
    • change it become asterisk:asterisk and permission 755
      • chown asterisk:asterisk /etc/asterisk/extensions_ivr.conf
      • chmod 755 /etc/asterisk/extensions_ivr.conf
  • Now the important things... you have to download waktu.php then save it to folder /var/lib/asterisk/agi-bin then change it become asterisk:asterisk and permission 755
      • chown asterisk:asterisk /var/lib/asterisk/agi-bin/waktu.php
      • chmod 755 /var/lib/asterisk/agi-bin/waktu.php
      •  

Rabu, 18 Maret 2015

Auto Dial Out

This is crazy ...
you can Prank call your friends with pre-recorded yours Boss's voice in the midnight.
it's cool right ?

How you can make it ? with Asterisk it's very-very easy.
First, You have to know about Auto Dial Out in Asterisk system
Second, Your asterisk need trunk connection to your local PSTN or celullar networks
Third, I think you need pre-recorded Boss's voices.

Auto Dial Out

On Asterisk we have to create .call file with your favorite text editor. e.g : nano or vi
 .call file containts (taken from http://www.voip-info.org) :
  • Specify where and how to call
    • Channel: <channel>: Channel to use for the call.
    • CallerID: "name" <number> Caller ID, Please note: It may not work if you do not respect the format: CallerID: "Some Name" <1234>
    • MaxRetries: <number> Number of retries before failing (not including the initial attempt, e.g. 0 = total of 1 attempt to make the call). Default is 0.
    • RetryTime: <number> Seconds between retries, Don't hammer an unavailable phone. Default is 300 (5 min).
    • WaitTime: <number> Seconds to wait for an answer. Default is 45.
    • Account: Set the account code to use.
  • If the call answers, connect it here:
    • Context: <context-name> Context in extensions.conf
    • Extension: <ext> Extension definition in extensions.conf
    • Priority: <priority> Priority of extension to start with
    • Set: Set a variable for use in the extension logic (example: file1=/tmp/to ); in Asterisk 1.0.x use 'SetVar' instead of 'Set'
    • Application: Asterisk Application to run (use instead of specifiying context, extension and priority)
    • Data: The options to be passed to application

.Call file example

Channel: SIP/ISDN/081513304002
Application: Playback
Data: yourbossvoice


081513304002 is my GSM number, please change it
yourbossvoice is sound recording with format mp3 or wav or gsm, save it into folder /var/lib/asterisk/sounds/en as default your asterisk's sound folder.

How it works ?

  • Create file 081513304002.call with nano in the folder /root
    • nano /root/081513304002.call
  • Copy paste  from .Call file example into 081513304002.call than save.
  • with your linux cronjobs, you can arrange file 081513304002.call will be copied into folder /var/spool/asterisk/outgoing/ in the midnight.
Just it ... have Fun... :)

Senin, 19 Januari 2015

HOW TO create TRUNK Elastix to GSM BOX (mobile voip)

Hii

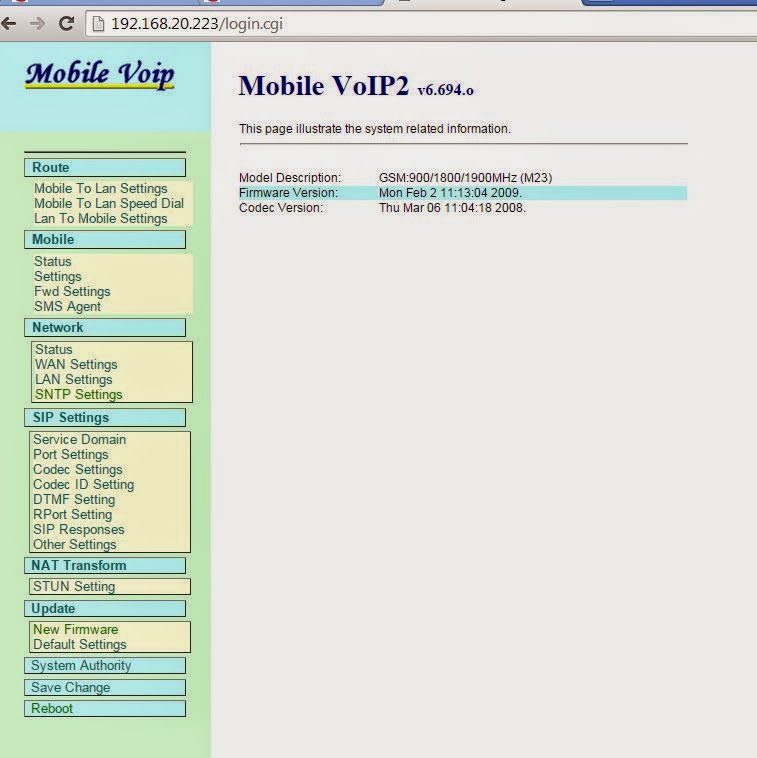
Meet with me again. Last week i had a project, how to make call from IP-PBX's extension to GSM number and using GSM BOX as VoiP Gateway. Final purposes are we can make call using same provider. So that we can save the cost or even for free.
The first challenge is to create a trunk connection between Asterisk ( Elastix ) to GSM BOX.

GSM BOX :
  1. Assuming we already have access to these devices, open with web browser http://ip.address
  2. Enter your credential, default is Username : voip and Password : voip

  3. This device is support 2 SIM card, so we have to create trunk for each other to Elastix, SIP Setting --> Service Domain 
    • Mobile 1
    • Mobile 2 

  4.  
Elastix :

  1. Setting trunk in your Elastix
    • for Mobile 1
    • for Mobile 2 

Minggu, 21 Desember 2014

HOW TO create Trunk Connection betwen Grandstream GXW4104 to Elastix

Elastix is IP-PBX, so we need connection to PSTN line in order to call to PSTN. How to connect ? So we need VoIP gateway.
Grandstream as vendor of VoIP product also has a product VoIP Gateway.
Grandstream GXW4104 is a product of VoIP gateway. it has 4 line PSTN, and LAN connection.
these is the step-by-step of configuration.
  1. in Grandstream GXW4104
    • login admin via web browser, assumption it has IP address 192.168.20.221 
    • in the Profile 1 tab, please fill your Elastix IPin SIP Server and Profile name. Don't forget option SIP Registration choose YES. then Update
    • Now we need to create trunk, one line PSTN is one account trunk in the Elastix. So if we had two line PSTN active, we need create two account. GXW4104 max have 4 line. for Authen Password = abcd1234.
    •  then Go to “FXO Lines” and set the Channel Dialing to PSTN section. 
      • Channel Dialing to PSTN Stage Method (1/2): ch1-4:1; (This option is for dialing a number directly
        to the PSTN, the option is for obtaining a dial tone to dial the number).
      • Channel Dialing to VoIP
        User ID: ch1-4:7661221; (This number has to match the DID number in the
        Incoming Route in Elastix Server)
      • PSTN to VoIP Caller ID Setting
        Number of Rings Before Pickup: ch1-4:4;
        Caller  ID  Scheme: ch1-4:1; (Choose  the  option  that  better  fits  to  your
        PSTN line)
        Caller ID Transport Type: ch1-4:4;
    • Click on the “Update” button and then POWER OFF the gateway and POWER ON
      again. When it is on, go to “Status” section and check out the channel 1 is registered and
      the PSTN line is connected and idle (the PSTN line must be connected in the first port).

  2. in Elastix
    • You have to login to dashboard.
    • choose PBX --> PBX Configuration --> Trunks
    • add new SIP trunk
    • Because we have two lines PSTN number so we have to create two trunks too.
      • Trunks801 
      • Trunks802
    •  After created trunks we need to route your calls. PBX --> PBX Configurations --> Outbound Routes
    • add new Route, if we pressed '6' from extension and then followed telephone number, calls will routed to TRUNK801 which is, it's a first your PSTN line. If line 1 is busy, so next route is TRUNK802, your second line.
    •  Done


Rabu, 17 Desember 2014

HOW TO Connect your IP-PBX Elastix to ISDN

What is ISDN ?
from Wikipedia :
Integrated Services for Digital Network (ISDN) is a set of communication standards for simultaneous digital transmission of voice, video, data, and other network services over the traditional circuits of the public switched telephone network. It was first defined in 1988 in the CCITT red book.[1] Prior to ISDN, the telephone system was viewed as a way to transport voice, with some special services available for data. The key feature of ISDN is that it integrates speech and data on the same lines, adding features that were not available in the classic telephone system. There are several kinds of access interfaces to ISDN defined as Basic Rate Interface (BRI), Primary Rate Interface (PRI), Narrowband ISDN (N-ISDN), and Broadband ISDN (B-ISDN).
In Indonesia (my country), ISDN was provided by PT Telkom Indonesia. This article is base on my customer who wants connect to ISDN as their upstream.

this is the Topology :
As we know, ISDN is using E1 carrier, So we had to prepare E1 cabling to make physical connection. This is the configuration of E1 cabling :
Assuming the cable connection is OK . Then there are several steps you should do :
  1. In System tab --> hardware Detector--> Detect New Hardware
  2.  if the cable not OK or unplug or ISDN is DOWN, these color should be 'pink'. If the cable OK, ISDN is UP you will get 'green' color 
  3. Please check and make sure : /etc/dahdi/system.conf :  loadzone=us
    defaultzone=us
    span=1,1,0,ccs,hdb3
    echocanceller=wanpipe_hwec - inactive,1-31
    bchan=1-15,17-31
    hardhdlc=16
  4. /etc/asterisk/chan_dahdi.conf : [trunkgroups]

    [channels]
    context=default
    usecallerid=yes
    hidecallerid=no
    callwaiting=yes
    usecallingpres=yes
    callwaitingcallerid=yes
    threewaycalling=yes
    transfer=yes
    canpark=yes
    cancallforward=yes
    callreturn=yes
    echocancel=yes
    echocancelwhenbridged=yes
    relaxdtmf=yes
    rxgain=0.0
    txgain=0.0
    group=0
    callgroup=0
    pickupgroup=0
    immediate=no

    ;Sangoma A102 port 1 [slot:0 bus:5 span:1] <wanpipe1>
    switchtype=euroisdn
    context=from-pstn
    group=0
    echocancel=yes
    faxdetect=incoming
    signalling=pri_cpe
    channel =>1-15,17-31
  5. For check status in Asterisk console, use command asterisk -rx "dahdi show channels"

Senin, 15 Desember 2014

HOW TO Activate video call in Elastix

Hi there, these tutorial will guide you How To activate video call. I hope you know, Elastix was made from FreePBX, so you have to entered FreePBX configuration. How is it ?

  1. Login to Elastix dashboard
  2. choose Security tab in above
  3. Select 'ON' in "Enable direct access (Non-embedded) to FreePBX: ", Then Save
  4.  After that choose PBX tab
  5. You will get FreePBX administration page. In the 'Tools --> Asterisk SIP Setting, please 'enable' Video Codecs 
  6. Submit then Apply your configuration.
  7. Done.

Rabu, 10 Desember 2014

HOW TO register your extension into X-Lite softphone

X-lite softphone, is software on MS Windows based for VoiP client. we can make our PC become IP-Phone using this applications. First, you have to download X-lite here
  1. After download you have to install. I thought, I do not need to explain how to install applications on Windows systems. You are too smart so it does not need to be discussed.
  2. Open your X-lite.
  3. Right-click on the screen and then choose "SIP Account Setting"
  4. click "Add" you will get Properties of Account 1 page, please fill the blank form. Based on article
    HOW TO Create SIP extension on Elastix we had created Extension 101 on the server Elastix 192.168.20.222 with secret "abcd1234"
  5. Click OK, back on to SIP Account window, please check 'Enable' for register your SIP Account, then click 'close' buttont
  6. Now your x-lite softphone is ready to make a call.